Showing posts with label i don't bake. Show all posts

Friday, December 2, 2011

recipe of the week: blueberry crumb breakfast cake

blueberry crumb breakfast cake
you're lucky i took a picture before i devoured it... ;-)
a recipe on pinterest caught my attention a few weeks back
and i decided it had to be made
(even though i'm not necessarily a breakfast person)

i don't know as this is the original pin
but i basically found this post while searching "blueberry crumb breakfast cake"
and it looked amazing


trust me...it's worth every moment.  i put everything together on a friday night and popped it into the oven saturday upon getting up.  DEFINITELY worth the time waited while it baked.

i made a couple of (very) slight modifications, so i'm listing the recipe as i did it.  


1/2 cup (1 stick) unsalted butter at room temperature
zest from one large lemon
1 cup sugar, plus more for topping
1 egg at room temperature
1 tsp vanilla
2 cups flour, measuring out 1/4 cup separately
2 tsp baking powder
1 tsp kosher salt
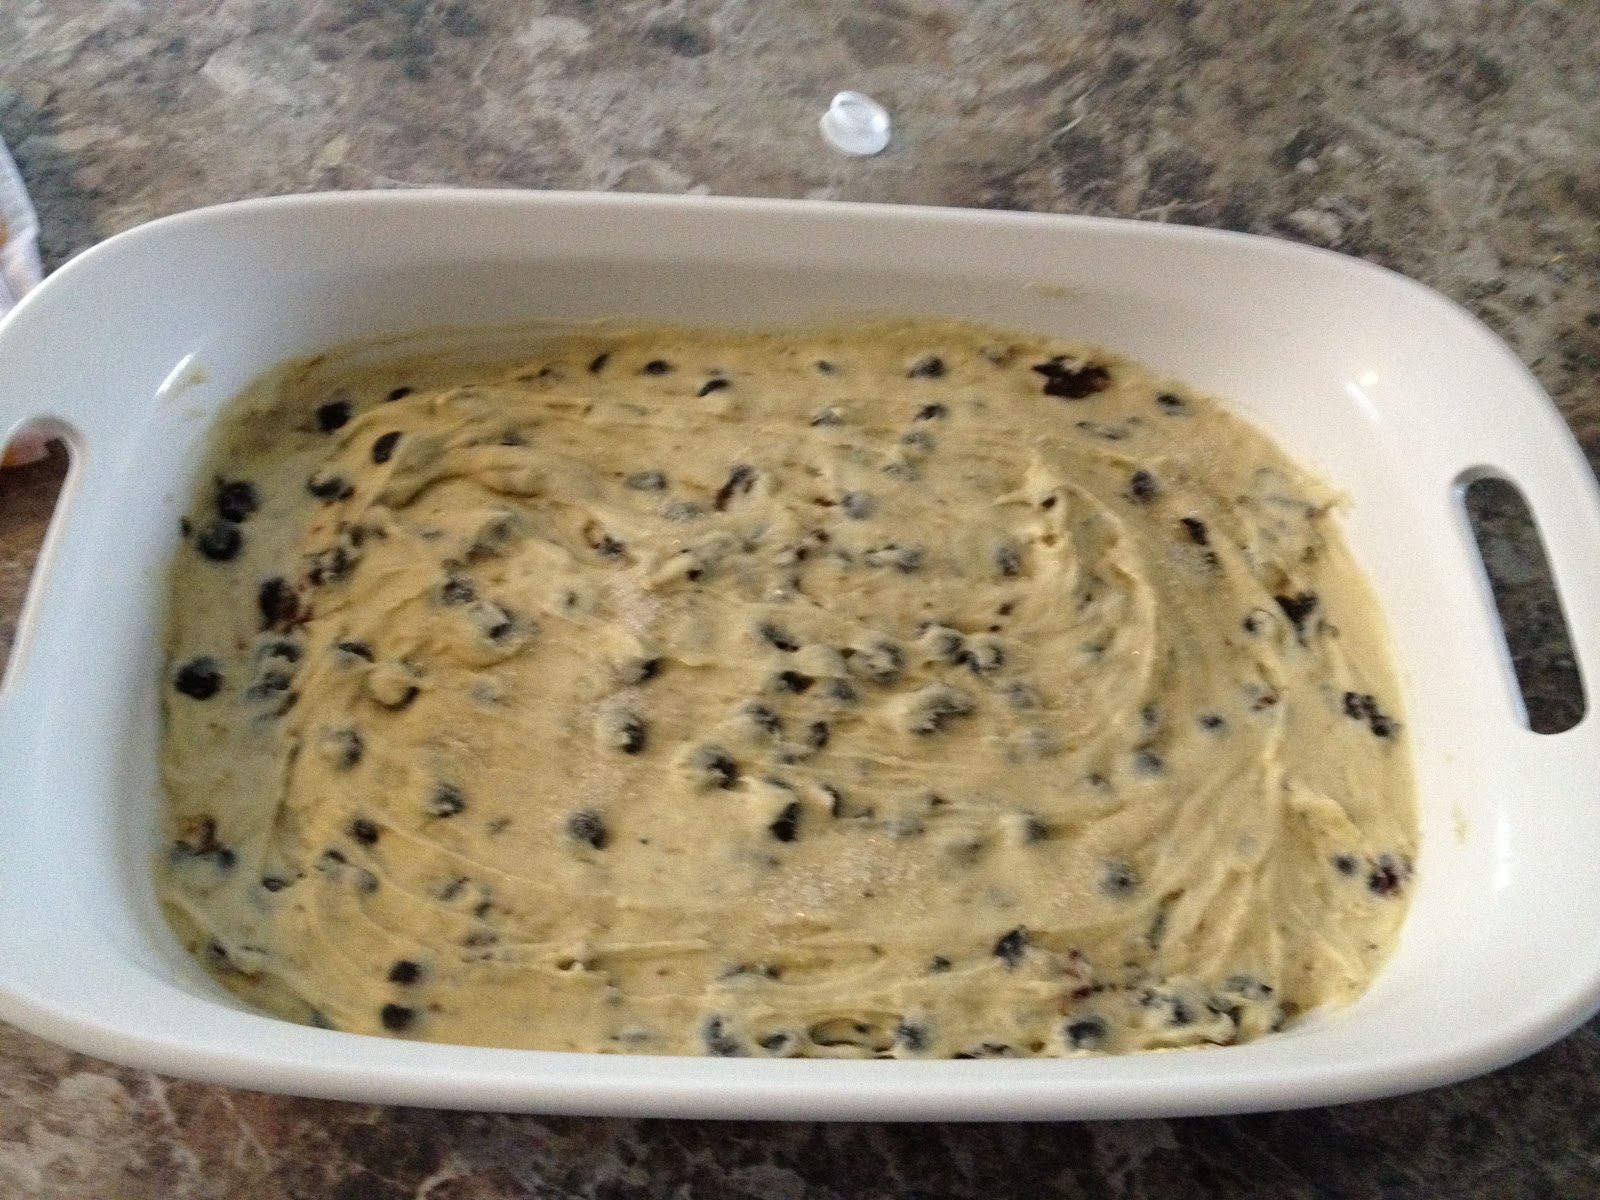
2 cups fresh blueberries
1/2 cup buttermilk *

*to make buttermilk, use the ratio of 1 tbsp lemon juice to 1 cup skim milk (putting the lemon juice into the cup and pouring in milk to the 1 cup line...so technically it's 7 tbsp of milk...7/8 cup...whatever)


cream butter with sugar and lemon zest until light and fluffy


add egg and vanilla, beat until combined


toss the fresh blueberries in a bowl with 1/4 cup of flour


whisk together the remaining flour, baking soda and salt


alternate adding the flour mixture and buttermilk  a bit at a time


then fold the blueberries in


after lightly greasing, spread batter in a baking dish


add at least 1 tbsp sugar to the top (i'm pretty sure i'll be using about 1/4 cup from now on.  we like a crunchy top.)


this is the point where i popped ours in the fridge overnight.  or, you can put it in an oven heated to 350゜


bake approximately 40 - 45 minutes (the original recipe says 35, but allowed up to 10 minutes more for baking.  i needed about 42 minutes.)


i test by using a chopstick, but you know...you can use a toothpick or fork :-)


it was ready.  YUM.


worth every moment.  


what are you waiting for?  don't you need some breakfast? :-)


Photobucket

Tuesday, October 19, 2010

recipe of the week: copycat scones

my friend natasha and i have been enjoying fall at starbucks
you see, on our road trip to arkansas we discovered that they had these a.m.a.z.i.n.g pumpkin scones

and we loved them
(they compliment pumpkin spice lattes quite well.  just in case you're wondering)

but, as you may have heard, starbucks
is a *little* expensive
so after our 2nd scone of the season
natasha ran across this little recipe

it's a copycat scone recipe
and while our version isn't as PRETTY as the starbucks version
it also cost us about 2 times the price of one of their scones to make 6 large or 24 mini scones
plus our version used all natural and organic ingredients from trader joe's
so it's better :)

so...there you go

i've simplified the recipe a little (we use pumpkin pie spice in place of the ginger, cinnamon, nutmeg and cloves the original recipe called for) and made it a little easier to understand (we stared at the recipe for several minutes the first time while we tried to figure out how they wanted us to cut the scones.  once we figured it out, we said "ok, we can do better than THAT"

one note: this recipe is actually 3 in one.  i'm listing the scones first, then the glazes.  whatever you do, take the time to make the glazes!  it means that you'll be waiting about 2 hours after they are done to enjoy them but it is SO worth it!

scones

2 cups flour
7 tablespoons sugar
1 tablespoon baking powder
1/2 teaspoon salt
2 teaspoons pumpkin pie spice
6 tablespoons cold butter
1/2 cup canned pumpkin
3 tablespoons half and half
1 egg

preheat oven to 425゜F.  lightly use butter to grease a pan/cookie sheet (we changed that from using oil. we figured it would be better to have buttered scones than oiled.  don't you?)

* combine dry ingredients (flour, sugar, baking powder, salt and spices) in a large bowl.  using a pastry knife, fork, or food processor, cut butter into the dry ingredients until mixture is crumbly and no chunks of butter are obvious.
(that is the hardest part, if you have only a fork.  i'm totally asking for a food processor for christmas.  or buying it myself first.  :)
* in a separate bowl whisk together pumpkin, half and half and egg.
fold wet ingredients into dry.  form the dough into a ball
* pat out dough onto a lightly floured surface and form into a rectangle approximately 1 inch thick.  it will turn out to be about 9 inches long and 3 inches wide.  use a large knife or pizza cutter to slice the dough into 3 equal long strips (2 cuts from top to bottom, making each strip about an inch wide).
* for large scones, cut each of your 3 long strips diagonally in the center, making 6 equally sized scones total.
* for small scones, cut 8 triangles out of each strip of dough, making 24 total scones
(i'm not convinced i said that any better than the original recipe...hard to explain!)
* bake for 14 - 16 minutes, or until light brown.  place on wire rack to cool while you make the glazes


powdered sugar glaze

1 cup powdered sugar, plus 1 tablespoon 
2 tablespoon whole milk

* mix the powdered sugar and milk together until smooth
* when scones are cool, use a brush to paint the glaze over the top of each scone
* wait for the first glaze to firm up while making the spiced glaze
 
spiced glaze

1 cup powdered sugar, plus 3 additional tablespoons
2 tablespoons whole milk
1 teaspoon pumpkin pie spice

combine ingredients, and then drizzle over each scone.  you can be all fancy with it, but it'll taste the same either way ;)

allow the icing to dry before serving...this will take about an hour.
(again, may i remind you that it's totally worth the wait)


enjoy!


Photobucket

Monday, September 14, 2009

Recipe of the Week -- Cake Mix Cookies

A few weeks ago, Marin posted this amazing recipe

And I may never, ever lose this weight now.
:0)

Actually, that's not an issue. They go like crazy when I take them anywhere. Definitely not a cookie you'll take home leftovers of.

Here's the cookies I made the first time:


This recipe is the easiest cookie ever.

1 box of cake mix of your choice (the first time I used the lemon she suggested. I have since done carrot cake, white cake with toffee crumbs mixed in, red velvet cake...they are pretty much all amazing)
1/3 cup butter
1/3 cup shortening
1 egg

Combine all ingredients until blended well
Roll dough into individual balls
Press dough into circles and arrange evenly on baking sheet
Bake at 375 for 9-12 minutes (I do 9 because I like mine a little dough-ier)

Enjoy!

I should mention that I had never even bought, much less used, shortening before in my life. But well worth it.

And cream cheese icing on the carrot cake/red velvet cake cookies is to DIE for.

That is all.

Enjoy!


Photobucket

Monday, March 2, 2009

Recipe of the Week -- Mint Chocolate Cake

I first made this for my boyfriend's birthday back in August. And since we're celebrating our 6 month dating anniversary tonight (it's only a few weeks late...ah well) I decided to make it again. He was quite excited when he figured out what it was going to be tonight.

Now...it's a multi-step recipe with multiple recipes! So bear with me :) Oh, and this is all from Southern Living, which I truly believe has some of the best recipes on the planet!


Chocolate Cake

1 1/2 cups semisweet chocolate chips
1/2 cup butter, softened
1 (16 oz) pkg light brown sugar
3 large eggs
2 cups flour
1 tsp baking soda
1/2 tsp salt
1 (8 oz) container sour cream
1 cup hot water
2 tsp vanilla extract
(peppermint frosting)
(chocolate ganache)

1. Melt chocolate morsels in a double boiler. Stir until smooth.
2. Beat softened butter and brown sugar at medium speed with an electric mixer about 5 minutes or until well blended. Add eggs, 1 at a time, beating just until blended after each addition. Add melted chocolate, beating just until blended.
3. Sift together flour, baking soda, and salt. Gradually add to chocolate mixture alternately with sour cream, beginning and ending with flour mixture. Beat at low speed just until blended after each addition. Gradually add 1 cup hot water in a slow, steady stream, beating at low speed just until blended. Stir in vanilla. Spoon batter evenly into 2 greased and floured 10-inch round cake pans.
4. Bake at 350° for 30 minutes or until a wooden pick inserted in center comes out clean. Cool in pans on wire racks 10 minutes; remove from pans, and let cool completely on wire racks. Spread Peppermint Frosting evenly between cake layers. Spread Chocolate Ganache evenly on top and sides of cake. *I also embellish the cake with JR Mints. Hence, Anthony calls this cake the JR Mint cake. :0)


Peppermint Frosting
1/2 cup butter, softened
1 (16 oz) pkg powdered sugar
1/3 cup milk
1/4 tsp peppermint oil
Beat butter at medium speed with an electric mixer until creamy; gradually add powdered sugar alternately with milk, beginning and ending with powdered sugar. Beat at low speed just until blended after each addition. Stir in peppermint oil.
Chocolate Ganache
1 (12 oz) pkg semisweet chocolate morsels
1/2 cup whipping cream
3 tablespoons butter
1. in double boiler, warm semisweet chocolate morsels and whipping cream until chocolate begins to melt. Whisk until chocolate melts and mixture is smooth. Whisk in butter, and let stand 20 minutes.
2. Beat at medium speed with an electric mixer 3 to 4 minutes or until soft peaks form.

Photobucket

Wednesday, February 18, 2009

Recipe of the Week -- Creme Brulee

When I make something like my angel food cake I always end up with lots of leftover egg yolks. Thankfully, you can freeze them (or egg whites) so I don't have to completely waste 12-14 yolks! However, they do need to be used at some point...

There are several recipes I use that call for only yolk. This one, though, is by FAR my favorite.

Creme Brulee (food network's version)

1 quart heavy cream
1 vanilla bean, split and scraped (they are SO expensive, but make all the difference)
1 cup vanilla sugar, divided in half (you can make vanilla sugar by simply adding vanilla extract to the sugar)
6 large egg yolks
2 quarts hot water

Preheat the oven to 325 degrees F.

Place the cream, vanilla bean and its pulp into a medium saucepan set over medium-high heat and bring to a boil. Remove from the heat, cover and allow to sit for 15 minutes. Remove the vanilla bean and reserve for another use.

In a medium bowl, whisk together 1/2 cup sugar and the egg yolks until well blended and it just starts to lighten in color. Add the cream a little at a time, stirring continually. Pour the liquid into 6 (7 to 8-ounce) ramekins. Place the ramekins into a large cake pan or roasting pan. Pour enough hot water into the pan to come halfway up the sides of the ramekins. Bake just until the creme brulee is set, but still trembling in the center, approximately 40 to 45 minutes. Remove the ramekins from the roasting pan and refrigerate for at least 2 hours and up to 3 days.

Remove the creme brulee from the refrigerator and let sit for at least 30 minutes. Divide the remaining 1/2 cup vanilla sugar equally among the 6 dishes and spread evenly on top. Using a torch*, melt the sugar and form a crispy top. Allow the creme brulee to sit for at least 5 minutes before serving.

*if you don't have a torch (like me) you can use your broiler setting on the oven to brown the tops. Just make sure to watch closely--the last thing you want is burnt brulee...even though "brulee" means burnt!

Tuesday, December 23, 2008

Recipe of the Week -- Peppermint Bark

Let me just get this out: I LOVE Peppermint Bark. Especially from Williams-Sonoma. Unfortunately, I don't love their price. Soooo...I searched several recipes until I found one that claimed to taste just like it and seemed simple to make. I have to say--not only do *I* love this recipe, A's whole family is a fan...and they're a tough audience!


Peppermint Bark

10 oz chocolate chips
12 oz white chocolate chips
1/2 tsp peppermint extract
3-4 peppermint candy canes, crushed

Heat oven to 250. Line a 9x13 pan with foil, letting it hang over the sides. Spray foil. Pour the chocolate chips in an even layer on the foil. Place in oven for 5 minutes or until almost melted. Remove from oven, smooth with an offset spatula
or knife. Place in refrigerator until cold and firm, about 20 minutes.
Melt white chocolate chips in microwave at medium power for 1 minute.
Stir until completely melted, stirring in extract. Pour this over chocolate layer, and, working quickly, spread to cover. Sprinkle with crushed candy canes.
Chill until both layers are firm. (I let it chill for about 30 minutes to an hour) Lift foil out of pan and shake off excess candy. Trim edges. Cut into 2” wide strips. Peel bark from foil and cut each strip as desired. Chill in covered container. Makes about 2 pounds.

Wednesday, May 21, 2008

Recipe of the Week - Heavenly Angel Food Cake

I'm in love with Southern Living recipes lately--apparently I'm embracing (finally) the inner Southern Belle. Here's a dessert from a couple of months ago that is fabulous! It's a perfectly light summer cake...perfect for humid Tennessee days!


Heavenly Angel Food Cake with Lemon Cream Cheese Frosting

2 1/2 cups sugar
1 1/2 cups all purpose flour
1/4 teaspoon salt
2 1/2 cups egg whites
1 teaspoon cream of tarter
1 teaspoon vanilla extract
1 teaspoon fresh lemon juice
Lemon Cream Cheese Frosting (recipe below)

Preheat oven to 375°. Line bottom and sides of a 13- x 9-inch pan with aluminum foil, allowing 2 to 3 inches to extend over sides of pan. (Do not grease pan or foil.) Sift together first 3 ingredients.
Beat egg whites and cream of tartar at high speed until stiff peaks form. Gradually fold in sugar mixture, 1/3 cup at a time, folding just until blended after each addition. Fold in vanilla and lemon juice. Spoon batter into prepared pan. (Pan will be very full. The batter will reach almost to the top of the pan.)
Bake at 375° on an oven rack one-third up from bottom of oven 30 to 35 minutes or until a wooden pick inserted in center of cake comes out clean. Invert cake onto a lightly greased wire rack; let cool, with pan over cake, 1 hour or until completely cool. Remove pan; peel foil off cake. Transfer cake to a serving platter. Spread Lemon-Cream Cheese Frosting evenly over top of cake. Garnish, if desired.

Lemon Cream Cheese Frosting

1 1/2 packages softened cream cheese
1/4 cup butter
1/4 cup fresh lemon juice
1 (16 oz) pkg powdered sugar
2 teaspoons lemon zest
Beat cream cheese and butter at medium speed with an electric mixer until creamy; add lemon juice, beating just until blended. Gradually add powdered sugar, beating at low speed until blended; stir in lemon zest.